Cancel Spotify Premium Subscription on Phone and Computer [Step-by-Step]
Sure, Spotify’s paid plan comes with many perks: high-quality audio, unlimited skips while listening to tracks, and best of all, no ads. But if you don’t listen enough to justify the cost, it’s smarter to discontinue Premium. By and large, Spotify membership cancellation is simple, and you can have it done in a matter of minutes.
We have put together this step-by-step guide on how to cancel Spotify Premium to help you navigate the process smoothly whether you’re on a mobile, tablet, or computer. By the end of this blog post, you’ll have everything to ensure that you’re not charged any further, as we’ve also included common troubleshooting solutions in case the cancellation process doesn’t work, which is common among users. It’s worth mentioning that we also recommend a way for you to download Spotify music to your local computer as a backup, so you won’t lose them after canceling your subscription.
What You Lose After Canceling Spotify Premium
Post-cancellation, you will still be able to enjoy the Premium benefits till the end of your billing date. However, if you are ending a zero-priced trial, your account will switch over to Spotify’s free service immediately. Once the benefits terminate:
- All your saved playlists will automatically be removed and you’ll lose the ability to download new content. This rule excludes podcasts.
- Other advanced features like audio quality and ad-free music listening will no longer be available.
The good news is your library playlists, Liked songs, activities, and saved podcast episodes still stay untouched just like before.
How to Cancel Spotify Premium Subscription on iPhone/Android
On mobile devices, Spotify makes it a bit tricky to find the cancellation button. It’s not immediately obvious where to go. Still, it only requires a few taps to end the Spotify paid plan. Alternatively, you can fill out the cancellation form. Let’s see both in detail.
Way 1. Through Spotify App
On Android mobile devices, you can cancel the Spotify Premium directly within the app. For many iOS users, the ‘Cancel Plan’ button will be missing depending on your region, so you will have to use the browser. Let’s go through steps one at a time.
On Android and iOS devices with pricing information:
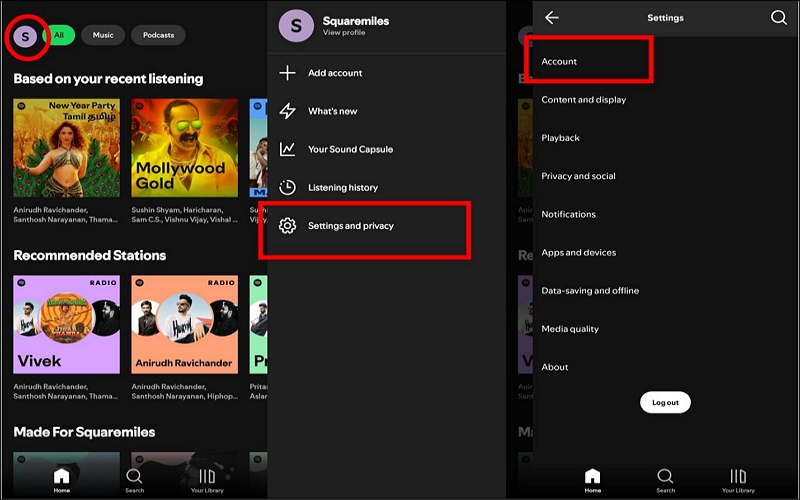
Step 1. Open the Spotify app and confirm that you are logged in via your Premium account. On the homepage, tap on your profile avatar and choose Settings and privacy from the side menu. Then, tap the Account option.
Step 2. In the Account section, choose See available plans. On the Available Plans page, select any plan that is not marked as Current to proceed to the Accounts Overview page. Next, choose Manage your subscription.
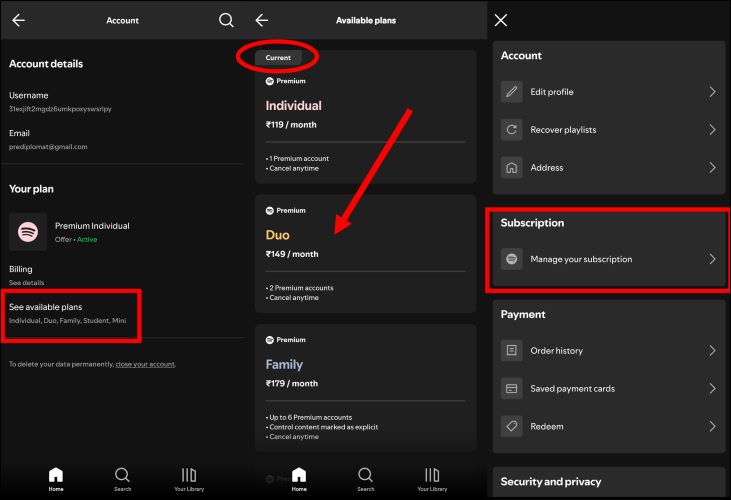
Step 3. After reaching the Manage your subscription page, choose the Change Plan button to once again view all the available plans.
Step 4: Navigate to the Spotify Free section at the very bottom, and tap Cancel Plan.
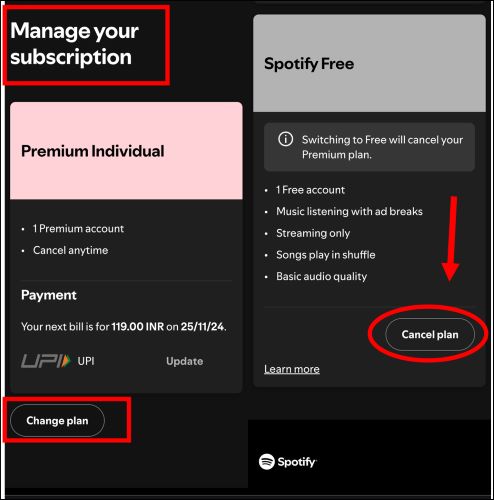
Step 5. It doesn’t end with a simple tap. On the next page, Spotify tries to bargain, proceed by selecting Continue to Cancel. And confirm by choosing the Yes, Cancel button.
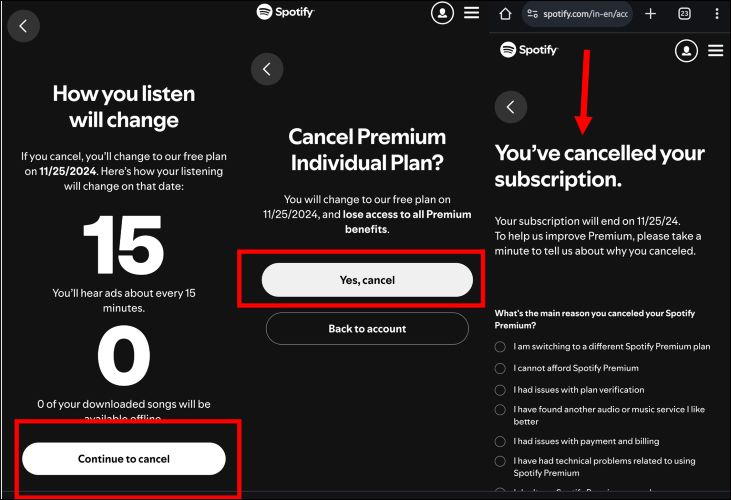
Once you see You’ve canceled your subscription message, you can be rest assured that your Premium membership is officially terminated and you won’t incur any further charges.
Way 2. Via Spotify Webpage
While all Spotify sign-ups are linked to an email, overtime, you can choose to login via other methods, like using your Username, phone number, and so on. But if you still remember the original email that you used to register, here’s an alternative method to cancel your Spotify membership:
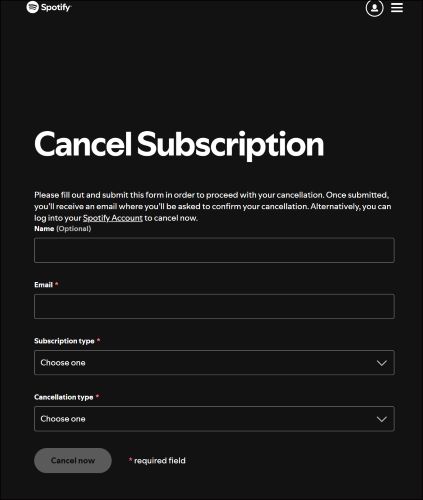
Simply, go to Spotify Subscription Cancellation Page and fill in the required fields on the form. This will include your email, subscription type, and cancellation reason (for simplicity, selecting Normal works well). And tap Cancel Now to submit.
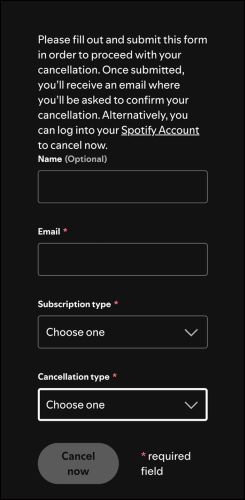
Note that filling up the details and opting for Cancel Now alone won’t cancel Spotify Premium. Spotify will send you a confirmation email. Go to your inbox, find the email, and make sure to to click on the Confirm Cancellation label to stop being further charged.
Alternatively, you can cancel the Spotify premium via the account page.
Step 1. Go to spotify.com/account and log in to your account. Navigate to Subscription heading, choose Manage your plan. Then, choose the Change Plan option.
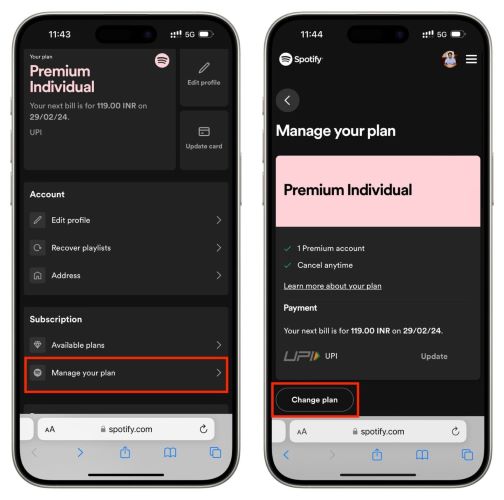
Step 2. Scroll down to Spotify Free at the very bottom, and tap Cancel Plan. On the summary page, choose Continue to Cancel, and confirm by selecting Yes, Cancel when prompted on the next screen.
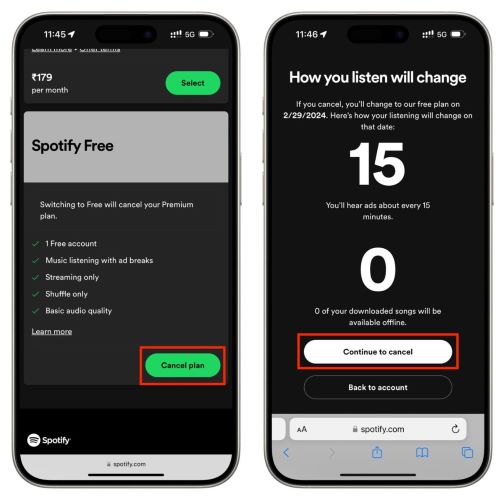
How to Cancel Spotify Premium Subscription on Windows/Mac
On Windows and Mac, the process largely remains similar as on mobile devices. Once again, you cannot cancel directly through Spotify’s desktop app. Here are two ways if you are on a computer.
Way 1. Use Spotify App
Follow these steps on your Mac or Windows PC to cancel Spotify Premium immediately:
Step 1. Access the Spotify desktop app, which will redirect you to the browser, saving you from logging in again.
Step 2. Choose Account from the top-right.
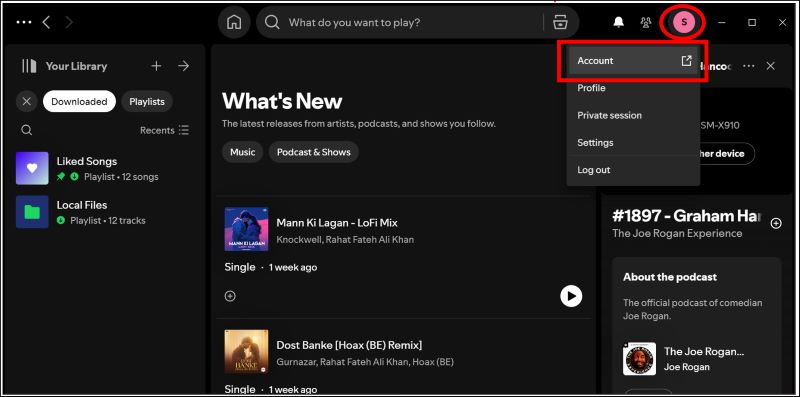
Step 3. Once you’re on the Account Overview page, click on Manage your subscription.
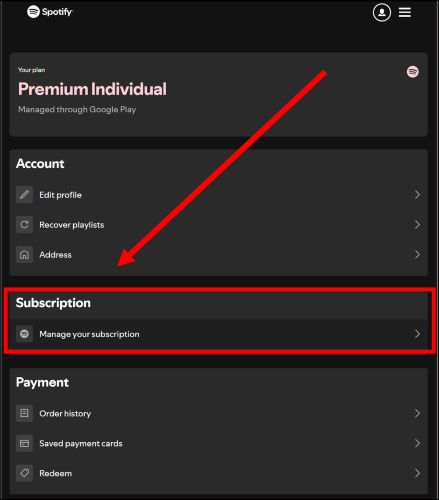
Step 4. Under your current plan details, select the Change Plan option.
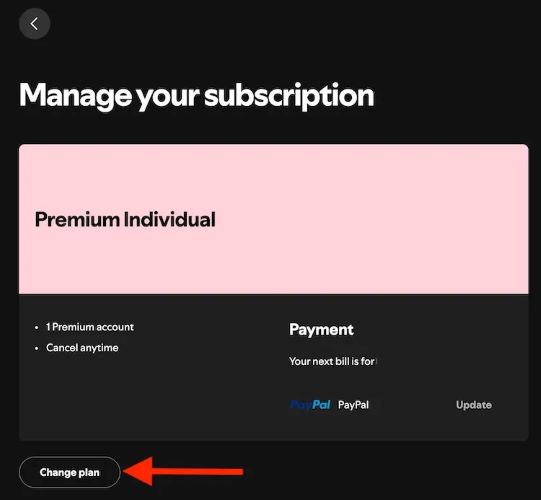
Step 5. Scroll to the Spotify Free section and choose Cancel plan.
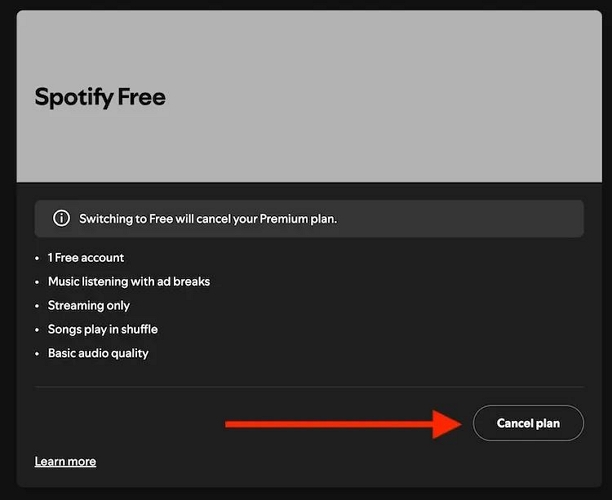
Step 6. Choose Continue to Cancel, then Yes, Cancel to confirm. You will receive a confirmation message saying You’ve canceled your subscription message upon successful termination.

Way 2. From Spotify Site
Just as discussed in the mobile section, you can directly access the Spotify Cancellation Page, fill in the required details, and select Cancel Now to send the cancellation request directly from your browser. Be sure to confirm the cancellation when prompted via the email to complete the process.
How to Keep Your Downloads After Canceling Spotify Premium
The thought of losing ad-free and offline access to your music may not sit well with you. Fret not! You can bring all your Spotify songs to your device using one-stop solutions like StreamFox for Music without the need for Spotify premium.
StreamFox for Music lets you download everything and anything available as MP3 within Spotify’s library directly to your computer at breakneck speed due to 50x faster performance. This way, you can bring any track, album, playlist, and even podcast or audiobook and make them accessible offline whenever your mood strikes.
The real charm of StreamFox is its interface that cleverly integrates Spotify web player, allowing you to effortlessly choose tracks from your own music library and convert them in a wide range of audio outputs.
- Save Spotify audio in MP3, M4A, WAV, FLAC, etc.
- The application preserve the original meta tags, such as song title, album cover, and other details.
- High-quality output up to 320 kbps and other customization options to get audio output as preferred.
- Dedicated apps both Windows and Mac.
Here are steps to download songs from Spotify using StreamFox for Music:
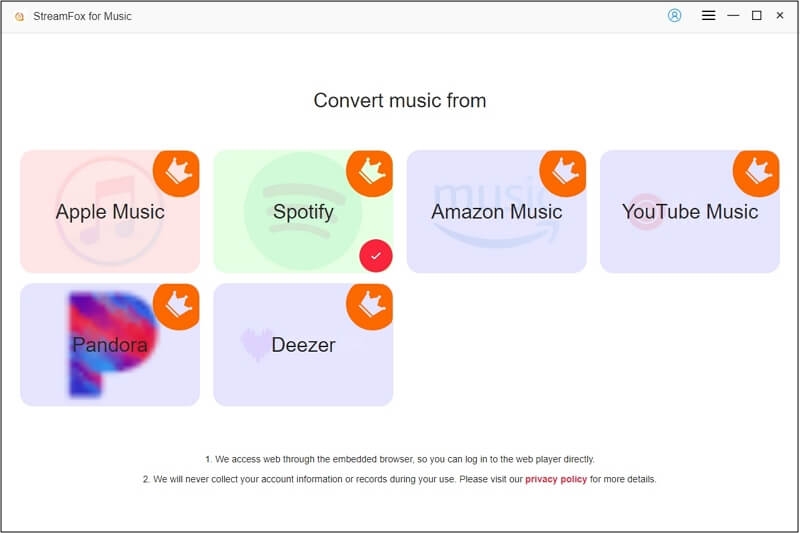
Step 1. Open StreamFox For Music on your PC or Mac. On the main dashboard, select Spotify.
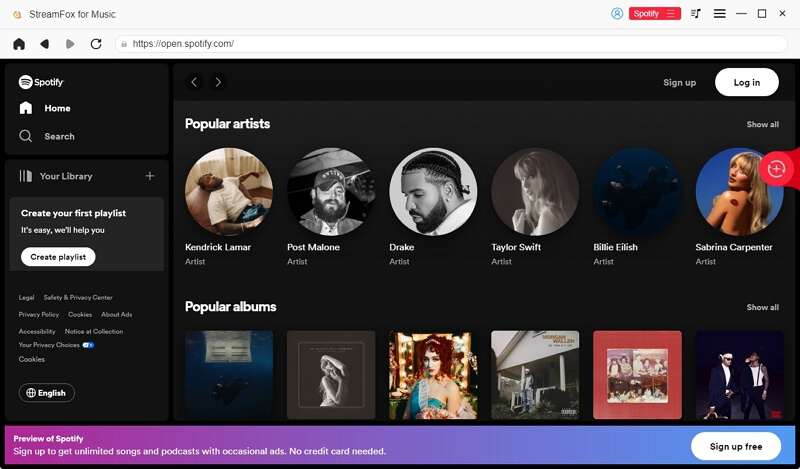
Step 2. On the following screen, you will find the familiar Spotify interface. Click on the Log in button and enter your Spotify credentials to access your music library within StreamFox.
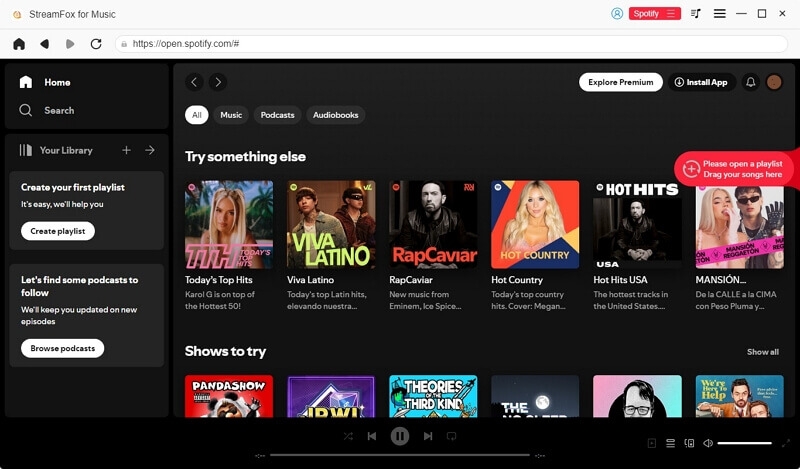
Step 3. To add songs, albums or playlists for conversion, simply select and drag them over to the Add ribbon located in the upper-right corner.
Step 4. Once you’re on the Converting tab, choose Convert All to begin saving the Spotify tracks to your local storage.
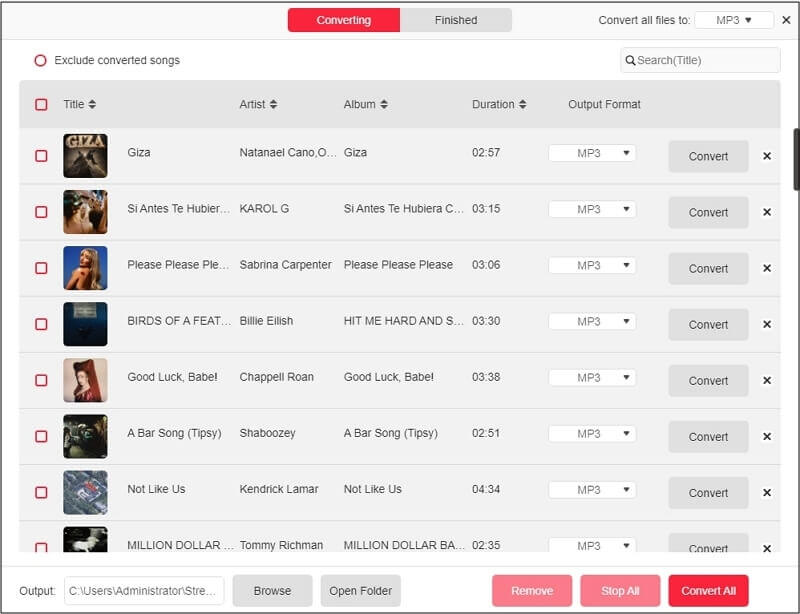
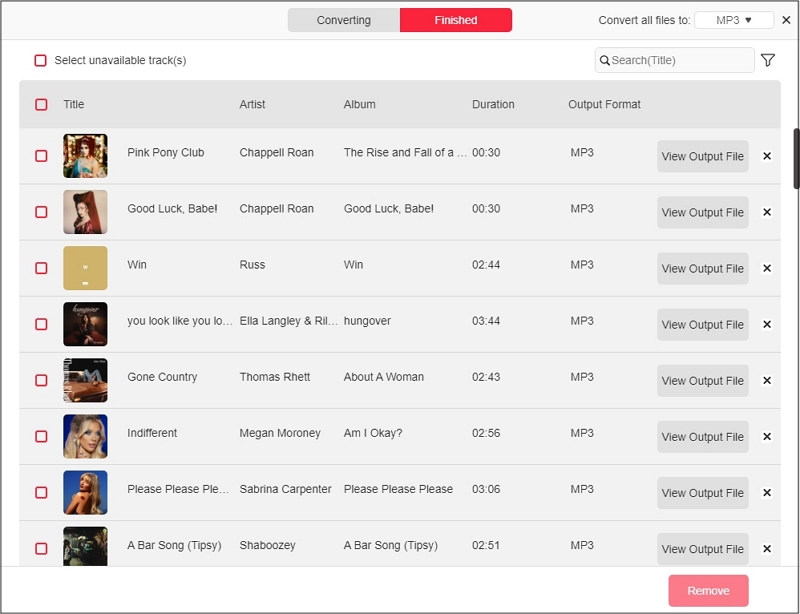
You can view the downloaded music via the Finished tab by clicking the View Output File option. Alternatively, you can navigate to the Downloads folder on your computer, where StreamFox creates a dedicated folder containing the converted tracks. You can play them via any music player and even transfer them onto your mobile devices.
How to Fix Spotify Cancel Subscription Not Working
More often than not, if you are unable to unsubscribe from your Spotify Premium, it’s because something is off on your end. Maybe you subscribed through a different payment medium, like Google Play Store or via your mobile carrier. However, the reasons for Spotify not letting you cancel extend beyond that. Here are solutions to help with your case.
Fix 1: Use Spotify Support Bot
A quick method to cancel your Spotify subscription, even if you have subscribed via other means, such as via mobile carrier, the App Store, or the Google Play Store, is to use the Spotify’s Support bot.
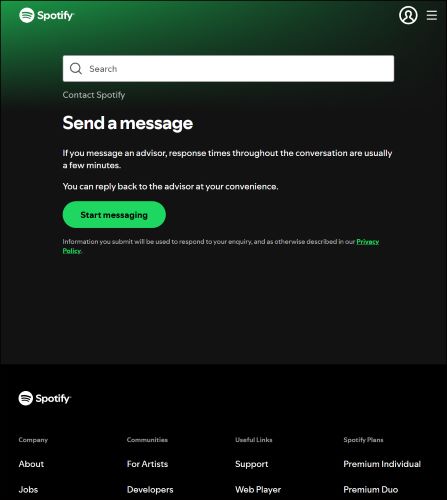
Step 1. Log in to your Spotify account through a web browser. And navigate to Spotify’s Message Support page. Choose Start Messaging.
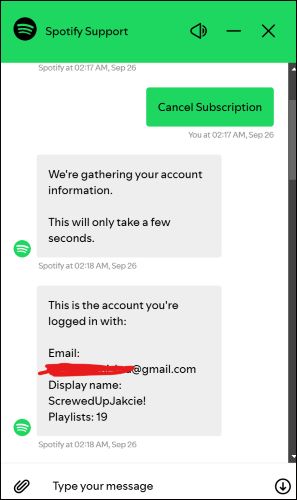
Step 2. Type Cancel Subscription and wait for the bot to verify your details.
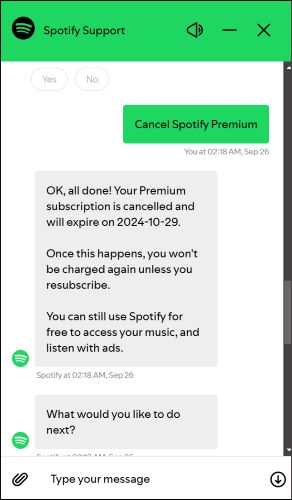
Step 3. Type Yes and wait. You’ll have two options: Close my account and Delete my data (choose this if you wish to permanently close your Spotify account). To only cancel your subscription but keep your account active, select the Cancel Spotify Premium button.
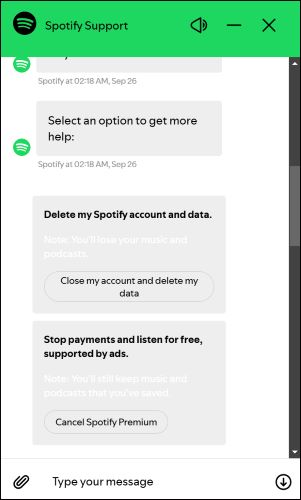
Step 4. Select Cancel Spotify Premium, and your subscription will be immediately suspended. You can also see the details like when your benefits will end.
Fix 2: Contact Plan Manager for Spotify Family and Duo Plan
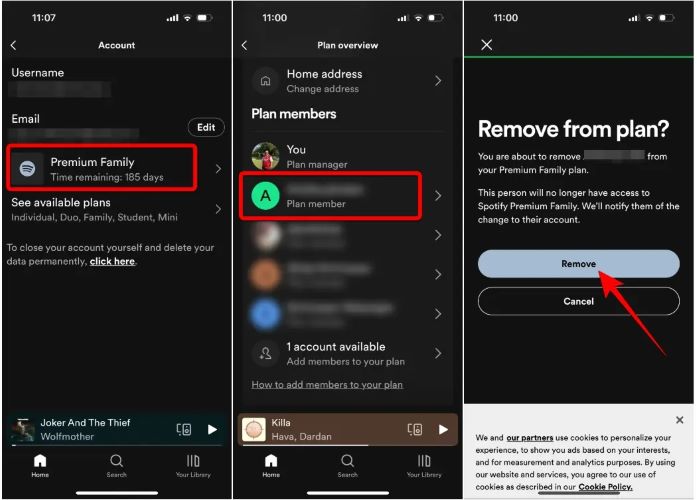
If you’re tied to a Duo Plan or Family Plan, note that only the Plan Manager (the person who set up the subscription) has the authority to make changes. You can simply ask the Plan Manager to remove you. Or you can ask them to cancel the subscription from their end: the steps which are the same as those discussed earlier.
Fix 3: Cancel Spotify Premium via Third-Party Providers
To find the default payment method that Spotify uses to charge you, simply tap the [Your Current Plan] button on the Accounts page. You will usually see the “You’ve used [This method] to subscribe” message. Once you find it, appropriate cancellation steps based on the payment method to cancel your Spotify Premium successfully:
From the Google Play Store
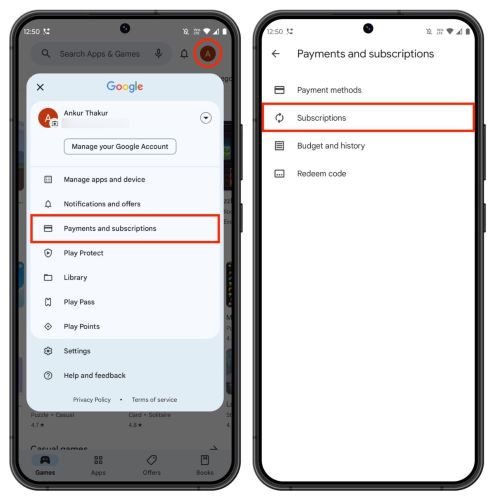
If your Spotify subscription is charged via Google Play balance or you’ve subscribed via the
- Open the Play Store app on your Android device.
- Tap your profile picture from the top.
- Go to Payments and subscriptions, then choose Subscriptions.
- Select Spotify and follow the on-screen steps to cancel.
From the iPhone Settings
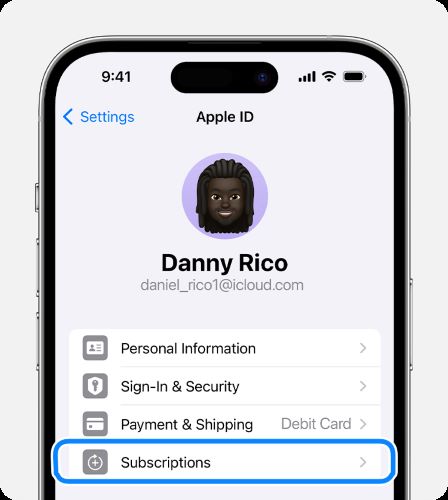
- Go to the Settings app on your iPhone and tap your name.
- Tap Subscriptions to see all your active subscriptions.
- Select Spotify from the list.
- Tap Cancel Subscription and confirm when prompted.
From the App Store on Mac
- Open the App Store app.
- Click your name.
- Click Account Settings.
- Scroll to Subscriptions, then click Manage.
- Select Spotify. Then, choose Cancel Subscription.
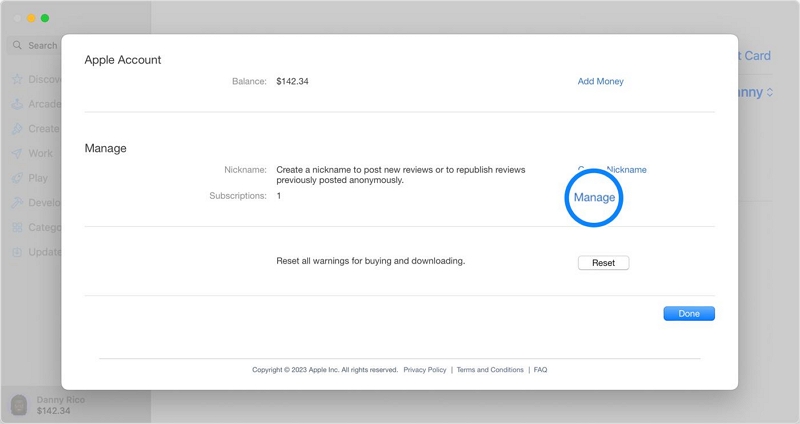
Via Contacting Mobile Carriers
If you get your subscription through your mobile provider, you can directly contact the service and ask to unlink your account from the offer. Spotify will automatically knock down to Free tier.
Fix 4: Contact Spotify Customer Support Team
For most of you, the above solutions, which are actually common among Spotify users, must have let you cancel the Premium subscription. But if the above has failed, you can fill out the Cancel Form and send it to Spotify via email (support@spotify.com) or post the printout to their address (Spotify AB, Birger Jarlsgatan 61, 113 56 Stockholm, Sweden).
For what it’s worth, keep in mind that Spotify’s Customer Support Team online can’t cancel your subscription for you. However, they can assist you with the right steps to cancel Spotify Premium using your preferred method.
Conclusion
That’s a wrap now! You should always aim to cancel Spotify Premium within the app or via Spotify’s website. However, you can use a third-party service if that doesn’t work. You will receive a confirmation email in any case. If not, reach out to Spotify to know the current status of your plan.
The good news is you don’t have to miss enjoying your Spotify music offline. You can use StreamFox for Music and download all your favorite music from Spotify to your computer directly, even when you don’t have a Premium account.


